

We all need to stay organized whether it’s business or personal. Google Calendar allows you to manage all your marketing content free of cost. So let’s take a look at how we can have less stress in our lives and manage our time better.
1. Click here to download…
Hubspot’s free editorial calendar templates for Google Calendar and Microsoft Excel. You will now have three editorial calendar templates on your computer to use: one for Google Calendar, one for Excel and one for Google Sheets.
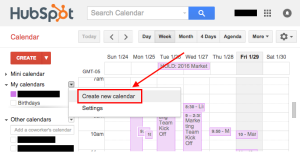
2. Create a new Google Calendar.
Go to your Google Calendar, and select “Create New Calendar” under the “My Calendars” drop-down arrow on the left-hand side of your screen.
Fill out the fields that appear on the next screen. 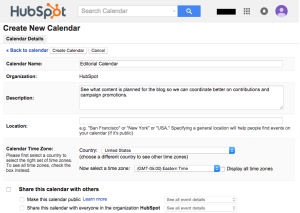 For now, keep the sharing options blank. This way, people won’t receive an out-of-context email about an incomplete calendar. When you’re done filling in the details, click “Create Calendar.”
3. 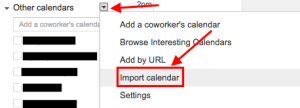 Import the CVS file from your download.
Select “Import calendar” under the “Other Calendars” drop-down menu on the left-hand side of your screen.
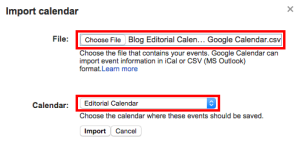
Click “Choose File,” and then locate the CSV file entitled “Blog Editorial Calendar – Google Calendar” that was included in the ZIP file you downloaded with this offer. For the “Calendar” option, be sure to choose the name of the calendar you just created from the dropdown menu. Then, click “Import.”
 You should see an Import calendar dialog box telling you that seven events were successfully imported. Click “Close.”
Now, navigate to January 3, 2016, which is the start of your calendar. Be sure all of your other calendars are temporarily hidden by clicking the colored box to the left of the calendar name. On the week of January 3, 2016, you should just see one “Blog TBD” calendar event on each day from 10 a.m. to 11 a.m.
4. Now determine your publishing schedule.
Your calendar has now been created. You need to fill it up with your blog publishing schedule.
While the CSV file you imported accounts for one blog post per day, this doesn’t mean you need to publish seven days a week. Maybe you want to publish every Monday, Wednesday and Friday. Perhaps you plan on publishing on just Thursdays. Don’t forget: blogging is about quality not quantity. You don’t want to commit to more than you can handle.
To decrease the number of days you want to publish, click on the calendar event of that day and select “Delete.”
Even if you wanted to publish multiple times a day, updating this calendar is as easy as adding an event. Select a slot on your calendar to add another “Blog TBD” event and copy the default description from another one of the events you imported.
Feel free to make any adjustments and move these events to whatever time your blog publishes during the day.
5. Set up recurring events.
You can make recurring events on your calendar. If you have a regular publishing schedule, like every Monday, Wednesday, and Friday at 10:00 a.m., for instance, then put that in as a recurring “slot” on your calendar. Even if you don’t have the content go ahead and put it in your calendar to remind you to publish it at some point.
To add your recurring slot, click on your first “Blog TBD” event and click “Edit event” to be taken to the details of the post. Here, you can set the post up as a recurring post so it automatically appears every Monday, Wednesday, and Friday at 10:00 a.m. (or whatever days and times you want).
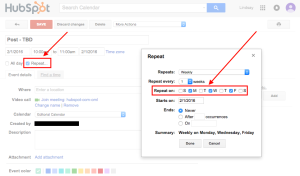
Once you’ve selected the recurring days, hit “Done” and “Save,” and you’ll have an editorial calendar framework to work with.
This calendar is a good way to set goals for yourself. If you know you want to publish a certain number of posts each week, even if you don’t hit every single slot, it’s a good reminder for yourself and your team that this is something you should all be striving for.
6. Fill your publishing slots.
Now is the time to fill out these slots. If you need any help coming up with ideas, use the idea generator here.
Let’s say one of the posts you want to write is “10 Surprising Facts,” and one of the posts you’ve already written and want to publish later is “Think You’re Cut Out?” Just add them both to the calendar by clicking on “Post – TBD” on the correct date, choosing “Edit Event,” and then changing the “Post – TBD” text to the actual title of the post.

Now let’s say you don’t actually want to write “10 Surprising Facts About Tapirs,” and you want your colleague to write it instead. To assign the post an author, you’ll invite them to the event as a guest. To do this, click on the event, hit “Edit Event,” then invite that colleague to the post by typing his or her name or email address into the “Add: Guests” box, selecting “Add” when their name pops up, and hitting “Save” on the event once you’re done.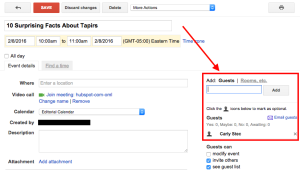
Now, anyone can see who is responsible for writing the post that’s going up in that time slot.
You can take it a step further by adding details to the “Description” box of the event. 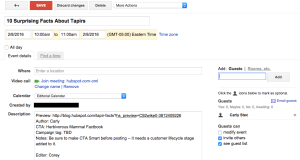 You might include a quick synopsis, the keywords you plan to target the post for, the target audience you’re trying to reach, and the offer or CTA you will direct the reader to at the end of the post. Don’t forget a due date for the draft.
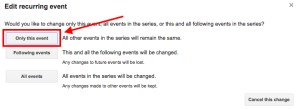
Before Google Calendar will let you save the event, you’ll see a dialog box asking if you would like to change just this event or all of the events in the series. Select “Only this event.”
7. Share your editorial calendar with others.
To share this editorial calendar with people, simply find your editorial calendar under “My Calendars,” click “Share this Calendar” when it appears in the drop-down arrow, and you’ll be taken to the same screen we saw in step one.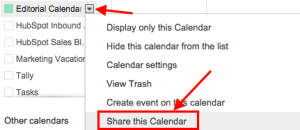
Under the “Share with specific people” heading, enter the email addresses of those on your content team and decide if they have viewing, editing, or admin privileges. Save your updated settings.
Thank you for your attention!
Recent Comments